


Single Player Tips and Tricks for Splatoon 3
Splatoon 3 has been out for a little bit now, and we absolutely love it here at Nintendo Link! However, the single player campaign can be a challenge for some players, and even more so if you are one of those completionists that is not satisfied unless you 100% a story.
Well, I have some good news! As someone who has 100%ed the campaign myself, I have compiled my own little list of tips and tricks I think are helpful for those looking to either complete the story and even 100% it all to earn that exclusive badge.
Without further ado, here are some tips and tricks for the Splatoon 3 single player campaign!
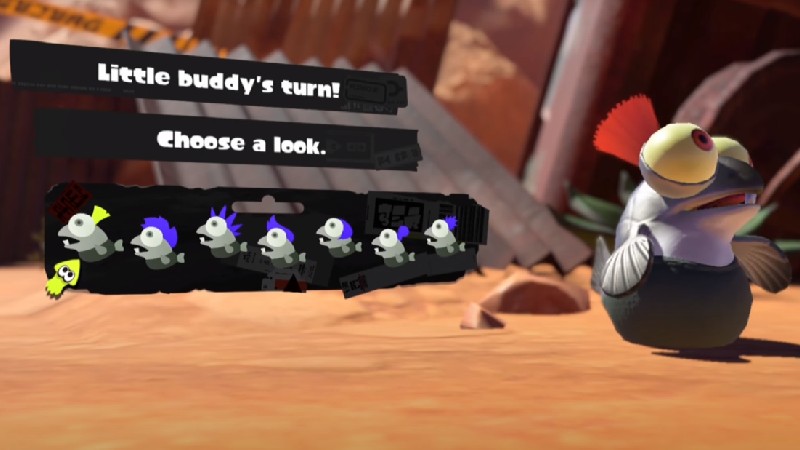
Use Your Smallfy
Smallfry is a new addition to the series, and the goofy fishling is a fantastic partner in the single player campaign that is an absolute necessity in some of the missions.
However, in the overworld stages, Smallfry can actually sniff out and find secrets, and if you pay attention to the map, there are two things to keep an eye on: the areas with lines in them (Undiscovered) and the areas with a green shader (Secrets).
Maximizing your findings will help you to gain more useful items like Salmonite and fish eggs to help upgrade your equipment, which will ultimately help you in the long run. It is worth noting, too, that discovering all areas of the map and collecting all the secrets will net you some lovely Callie and Marie badges to show off on your Splashtag.
Play the Stages You Enjoy Most
The single player campaign in Splatoon 3 is excellent and a huge improvement from the previous two entries, but it does have some stages that can be quite the pain for those more on the casual side of things. I’m here to tell you that you barely have to play half the stages to access the end game, so if you are not worried about 100%ing the campaign, do not worry about playing all the stages!
Instead, find the ones you enjoy the most and just enjoy yourself. Those harder levels, especially the sniper ones and rail ones, are meant to be a challenge for experienced players, so please do not feel like you have to do them yourself if you don’t want to.
I will say that the ending sequence in Splatoon 3 is spectacular, so if you have been discouraged by some of your gameplay because of certain stages, skip those and find others to play. You will regret missing the end. I promise.
Fast Travel is Your Friend
In Splatoon 3’s single player, similar to the previous two, the stages are through these kettles that you have to ink before they open and you can dive in. Well, here’s a fun trick: Some times there are kettles that are seemingly out of reach that you can barely hit with your ink. Well, if you continue to hit them (You will hear the sound), you can absolutely open up the kettle before you are supposed to.
Doing this gives you access to that kettle to play the stage and to fast travel to. In certain areas, this kind of shortcutting can get you to some pivotal points, like boss encounters, with very little effort. This tip is especially for people who just want to quickly fight the bosses and clear the campaign, but it can also serve in just finding fun ways to “break” the game.
Also, using the map regularly is so important, because it continues to show you where you have not been to yet, where secrets continue to hide, and what kettles you have unlocked so you can fast travel to them. Definitely find ways to open up those kettles, because more fast travel points means quicker access to areas you may need to visit later.

100%ing Splatoon 3 Campaign
In order to 100% the Splatoon 3 campaign, you have to clear all 65 kettle levels and clear the game. Upon doing so, you will unlock one more final stage that will be its own point in this tips and tricks guide. But first, we have to talk about the elephant in the room: One-Way Ride Through Target Town.
In Site 5, there is a long and exhausting rail level with no checkpoints called One-Way Ride Through Target Town. This is the hardest normal stages in the campaign, and it is one that has driven many players insane. Essentially, you are given a choice of three weapons (Heavy Splatling, Rapid Blaster, or Tri-Stringer), and you are tasked with riding on a nonstop rail shooting at and successfully hitting box targets until the end. Once again, there are no checkpoints.
My advice is to avoid the recommended Tri-Stringer and use the Rapid Blaster instead. The Rapid Blaster has solid range and is capable of clearing full sets of target boxes in one shot, and I think it is much more user-friendly than the Tri-Stringer. This stage just takes a LOT of practice, so please be patient. The ending sequence is where I will share my final wisdom: After clearing a diagonal stack of target boxes, you will arrive at a red box with a yellow one above it. The red ones take a lot more damage, so I advise throwing a Splat Bomb right at the base, squidding to collect ink, and then shoot it like crazy to knock it out.
Hopefully that helps, but please know that this is a tough stage no matter how much advice I give you. Good luck.
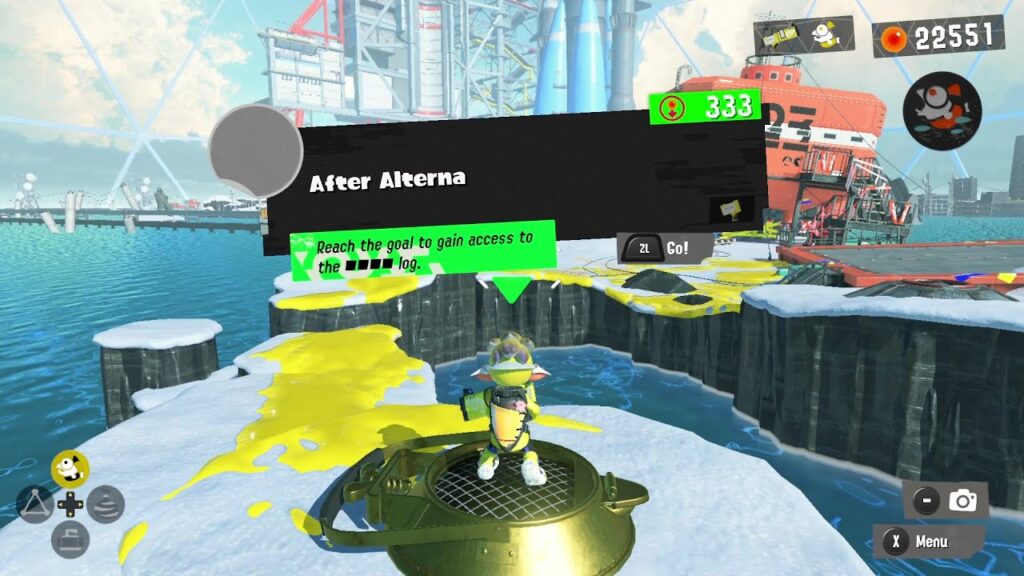
After Alterna: The Final Challenge
After completing all stages in the Splatoon 3 campaign, you will be presented a final stage that is located at the very beginning of Site 1, where you initially land after the tutorial stages. Notice that the entry fee is 333 eggs, which is significantly more expensive than any stage previous.
Now, After Alterna is not for the faint of heart. Thankfully, there are checkpoints, but each of the sections are long, difficult, and exhausting. Don’t get me wrong, it is a lot of fun for those looking for a challenge, but it is not easy at all. Remember to earn a lot of extra eggs before entering so that you have plenty of finances to continue when losing lives (Continues cost 333 fish eggs, too).
As for the sections themselves, I will actually share a video below. However, I will share some advice for the final section where you have to fight off roughly a dozen Octolings. When you get to the section with the Octolings, sick to the outside, as the middle will become too chaotic. I found it helpful to stay between two entry points for the Octolings for quick kills, and I took my time picking them off. You definitely do not want to rush this last section, especially when the last few Octolings spawn, because they pack some heavy punches and use special abilities.
Check out the video guide for more:
Enjoy Splatoon 3!
And those are our tips and tricks for Splatoon 3‘s single player campaign. There is a whole lot more that could be shared, but I thought these few points were helpful for those looking to quickly clear the story mode and for those looking to knock it all out. Either way, we just advise that you play it your way! Enjoy it.
There is a lot to love about Splatoon 3 and its story mode, so please do not let it weigh you down. If you are finding yourself getting frustrated, it is okay to take a break, breathe, and come back later. It is also okay to not 100% the campaign if it is too difficult for you.
I hope this was helpful and insight!
Thank you for stopping by Nintendo Link for all of your guides and updates! What do you think of single player tips and tricks? Was this helpful? Let us know in the comments below! Happy gaming, everyone.